

Veterans' Rucking for Beginners: Warbeard Starter Kit and 8 Week Plan
Start with a rucksack that holds a 20-pound plate or sandbag, firm supportive shoes, merino wool socks, and layered, non-cotton clothing. That’s the entire starter kit. Cover the areas where the pack sits against your body to prevent chafing, and never test new boots, a new pack, or any untested gear on event day. Break everything in on training rucks first.
TL;DR:
- A pack with an internal frame, a padded hip belt, and a dedicated plate pocket significantly reduces shoulder strain and improves load stability for beginners.
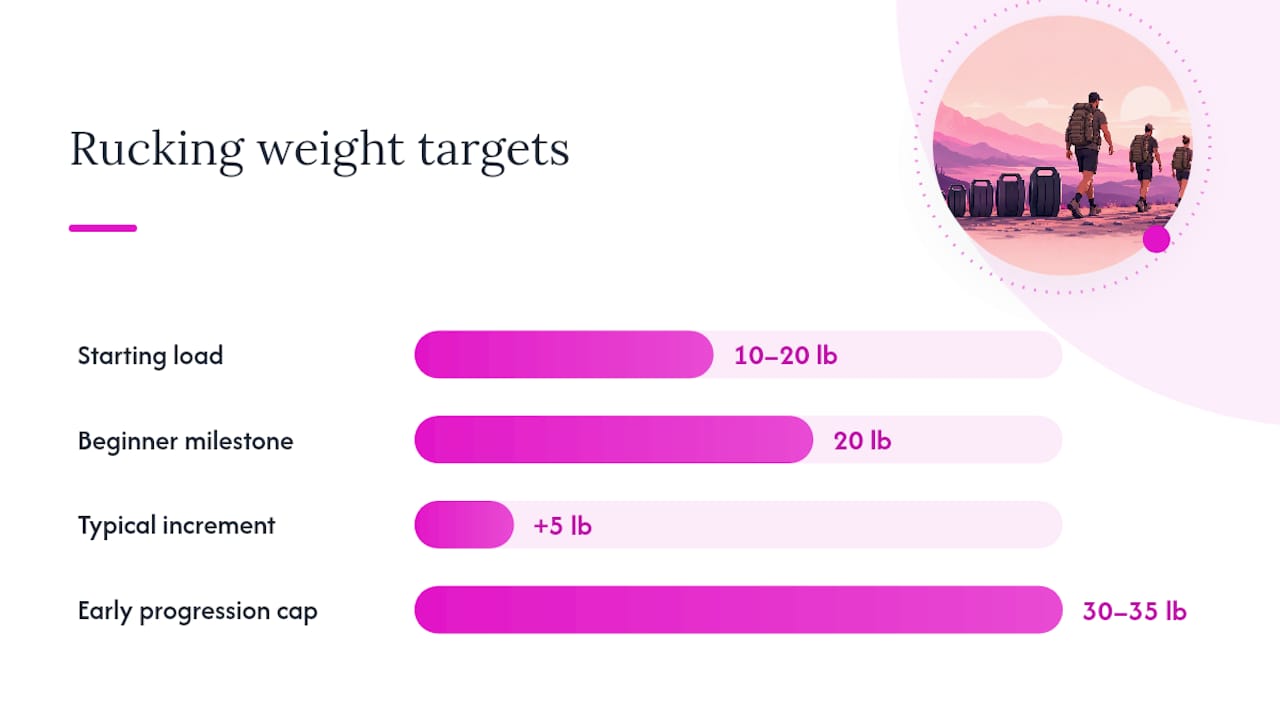
- Starting with a 20-pound plate or sandbag, increasing weight gradually by 5 pounds every two to three weeks, caps around 30 to 35 pounds to prevent joint injury.
- Use moisture-wicking layers, especially merino wool or synthetic fabrics, and avoid cotton to prevent blisters and chafing during longer or hotter sessions.
- Rucking shoes should fit well with a firm midsole and wide toe box, with trail runners often outperforming issued boots on pavement and light trail routes.
- Proper warm-up, cool-down, and correcting posture—keeping the torso upright, securing the hip belt, and landing midfoot—are essential to prevent injuries and maintain comfort.
Table of Contents
- Rucking for Beginners: What to Wear and Why It Matters
- What Pack Features Actually Matter for a Beginner Rucksack?
- Should Beginners Use Ruck Plates or Sandbags?
- Footwear and Socks: Military Rules vs. Civilian Choices
- A Simple 8-Week Rucking Progression for Beginners
- Packing Checklist: What Goes in the Ruck Before You Leave
- Gear Maintenance: Keeping Your Pack, Plate, and Shoes Ready
- Rucking Form: How to Carry Weight Without Wrecking Your Back
- Warm-Up and Cool-Down Routines That Actually Help
- Common Rucking Injuries and How to Avoid Them
- Nutrition and Hydration for a Rucking Session
- Staying Motivated Through Your First Weeks of Rucking
- Why Consistency Beats Gear Every Time
- Post-Ruck Comfort: Apparel That Fits a Rucker’s Routine
- Sources
Rucking for Beginners: What to Wear and Why It Matters
Clothing choice determines whether your first few rucks build confidence or leave you with blisters and a raw back. The rule is simple: dress in layers, choose moisture-wicking fabrics over cotton, and keep the areas your pack touches covered with a comfortable, snug-fitting top.
A base layer of merino wool or a synthetic blend pulls sweat away from your skin. Cotton does the opposite. It holds moisture, gets heavy, and turns into a chafe machine once you’ve got weight on your back for an hour. A mid layer, like a fleece quarter zip, handles cooler mornings, and a packable rain shell earns its weight the first time a ruck gets rained on. Dressing in layers and covering ruck-contact points is standard advice from experienced ruck event organizers, and it holds up whether you’re training solo or walking a formation route with a unit.
For everyday training miles, comfort wins over anything else. A relaxed cotton or cotton-blend tee like the VietNam Classic tee works fine for a short, easy ruck around the neighborhood, but save your technical moisture-wicking gear for longer or hotter sessions where fabric performance actually matters.
- Base layer: merino or synthetic tee, no cotton for anything over 3 miles
- Mid layer: light fleece or wind shirt for temperature swings
- Outer layer: packable rain shell, even if the forecast looks clear
- Bottoms: athletic pants or shorts with a gusseted crotch to reduce thigh rub
- Extra: hat or visor for sun coverage, especially on exposed routes
Pro Tip: Pack a dry shirt and a fresh pair of socks in your car or gear bag. Standing around in a sweat-soaked shirt after a ruck is how people catch a chill even in warm weather.
What Pack Features Actually Matter for a Beginner Rucksack?
The pack makes or breaks the experience before the weight even comes into play. Three features separate a pack that carries weight properly from one that will leave your shoulders wrecked early: a frame sheet or internal frame, a dedicated plate pocket or a way to secure loose weight against your back, and a padded hip belt that can actually take a load.
Ruck Authority’s gear breakdown treats the pack as one of three core pillars, alongside weight and socks, and recommends upgrading in a specific order: socks first, then pack, then plate, then shoes. That sequence matters because a good pack with weak socks still produces blisters, while great socks in a bad pack still wreck your shoulders.
Look for these details before buying anything ruck-specific:
- Internal frame or rigid frame sheet that transfers load to your hips, not just your shoulders
- Sternum strap and load-lifter straps to stabilize the pack during movement
- Padded, adjustable hip belt that carries a significant portion of your load
- Durable fabric, ideally 1000D Cordura or a comparable heavy-denier nylon
- A capacity between 20 and 30 liters for most beginner sessions
If you don’t own a ruck-specific pack yet, a sturdy daypack with a frame sheet works as a temporary substitute. Wrap your weight in a towel or old shirt so it doesn’t shift or dig into your spine, and cinch any compression straps tight. Once you’re rucking three or more times a week and the daypack starts showing wear at the seams or the straps go flat, that’s your signal to upgrade to something built for the job.
Should Beginners Use Ruck Plates or Sandbags?
A flat steel or cast-iron ruck plate is the more stable option because it sits flush against your back and doesn’t shift while you walk. A sandbag or DIY filler, like wrapped bricks or a rice-filled duffel, costs less and lets you adjust weight in small increments as you build tolerance.
Ruck Authority’s beginner starter kit guidance points out that a 20-pound plate is a common milestone for new ruckers, and sand-filled bags remain the cheapest way to test different loads before committing to steel. Both approaches work. The plate wins on consistency, the sandbag wins on flexibility while you’re still figuring out what weight feels right.
Here’s a safe way to build up load over time:
- Start at 10 to 20 pounds, depending on your fitness level and body weight, and walk a distance you already know well.
- Once that weight feels easy for two to three sessions in a row, add 5 pounds.
- Repeat every two to three weeks, always increasing weight after distance feels comfortable, never before.
- Cap early progression around 30 to 35 pounds until your joints and connective tissue catch up with your cardio.
If you’re using a DIY sandbag, double-bag the sand and reinforce every seam with duct tape. A blowout mid-ruck is messy and it ruins your pack’s lining.
Pro Tip: Buy the plate once you’re rucking consistently three times a week. At that point, the convenience of a load that never shifts is worth more than the money you’d save wrapping bricks.
Footwear and Socks: Military Rules vs. Civilian Choices
If you’re rucking as part of a military-division event or organized formation, you wear approved boots. That’s not optional. Approved boots are the standard for military-division ruckers, and organizers check for it. Civilians and supporters have more room to work with: trail runners, hiking boots, or firm cross trainers with a supportive midsole all perform well for pavement and light trail rucking.
Socks matter as much as shoes, maybe more. Cotton socks trap moisture and set up the exact friction that causes blisters. Merino wool socks, brands like Darn Tough are a common recommendation, wick sweat and hold their shape mile after mile.
- Fit cues to check: a wide enough toe box that your toes aren’t compressed, a firm (not squishy) midsole, and a heel that locks in place without sliding
- Break in every pair on training miles, never on event day
- Try shoes on at the end of the day when your feet have naturally swollen from normal use
- Rotate two pairs of shoes if you’re rucking often, which roughly doubles the useful life of each pair
Veterans coming back to rucking after time away from service sometimes assume issued boots are still the best option for everything. Trail runners or firm midsole shoes often outperform soft running shoes on pavement-heavy training, even for people who spent years in boots. Save the boots for actual field terrain or organized events that require them.
A Simple 8-Week Rucking Progression for Beginners
Weight, distance, and frequency all need to increase separately, not all at once. Piling on more of everything in the same week is the fastest way to end up with a joint injury before you’ve built the tolerance to handle it.
- Weeks 1 to 2: 10 to 15 pounds, 1.5 to 2 miles, two to three sessions per week.
- Weeks 3 to 4: 15 to 20 pounds, 2.5 to 3 miles, keeping frequency the same.
- Weeks 5 to 6: 20 to 25 pounds, 3 to 4 miles once that distance feels comfortable at the lighter load.
- Weeks 7 to 8: 25 to 30 pounds, 4 to 5 miles, adding a fourth weekly session if recovery allows.
Veterans returning to rucking are often advised to start at 20 to 30 pounds and lock in a comfortable 3 to 4 mile distance before pushing the load higher. Aim for a pace around 15 to 20 minutes per mile, and focus on a steady, even cadence rather than speed. Add distance before you add weight, and if a joint aches rather than just feeling tired, that’s a rest day, not a rest week.
Persistent pain that doesn’t ease after a few days off, especially in the knees, hips, or lower back, is worth a visit to a doctor or physical therapist before you keep pushing.
Packing Checklist: What Goes in the Ruck Before You Leave
A short list of small items prevents almost every common first-ruck failure.
- Water (see hydration guidance below), ID, phone, and a small first-aid kit
- Sunscreen and a hat, even on overcast days
- Spare merino socks, Moleskin, an anti-chafe balm like Body Glide, and foot powder
- A basic blister kit with adhesive pads and antiseptic wipes
- A packable rain shell and a warm layer if temperatures might drop
- Hand warmers for cold-weather sessions and spare footwear if your pack has room
For after the ruck, pack a dry shirt, a towel, and a recovery snack with protein and carbs. Ruck Authority’s starter kit checklist treats socks and anti-chafe products as essential, not optional extras, and that’s the right instinct. Small, cheap items solve the problems that actually end first rucks early.
Gear Maintenance: Keeping Your Pack, Plate, and Shoes Ready
Your gear needs upkeep between sessions or it will fail you exactly when you don’t want it to.
- Hand wash your rucksack with mild soap and let it air dry; refresh the DWR water-repellent coating when water stops beading on the fabric
- Store plates and sandbags somewhere dry to prevent rust on steel or mildew on canvas
- Air out shoes fully between sessions and rotate two pairs if you’re rucking often
- Expect a working shoe lifespan of several hundred miles before cushioning and support break down
- Before every ruck, check pack stitching, hip belt buckles, and plate pocket closures for wear
Rucking Form: How to Carry Weight Without Wrecking Your Back
Posture under load is different from normal walking posture, and getting it wrong is how a fun workout turns into a back problem. Keep your torso upright, not hunched forward and not leaning back to counterbalance the pack. A slight forward lean from the ankles, not the waist, is normal once the weight gets heavier, but rounding your shoulders or craning your neck forward puts strain exactly where you don’t want it.
Your hip belt should be doing real work. A properly adjusted belt carries 60 to 70 percent of the total load, according to veteran-focused rucking coaching, which takes pressure off your shoulders and spine. If your shoulders feel the brunt of the weight within the first half mile, tighten the hip belt before you touch the shoulder straps.
Foot strike matters too. Land closer to a natural midfoot or heel-to-midfoot pattern rather than pounding your heels into the pavement with every step. Keep your stride length a little shorter than your normal walking stride. Overreaching with each step under load stresses your knees and hip flexors more than a shorter, quicker cadence does.
Arms should swing naturally and loosely, not locked against your sides gripping the shoulder straps. If you catch yourself white-knuckling the straps, that’s usually a sign the pack isn’t fitted correctly or the load is heavier than you’re ready for. Check the hip belt tension and frame adjustment before assuming you just need to push through it.
Warm-Up and Cool-Down Routines That Actually Help
Rucking loads your joints and connective tissue in a way that flat, unweighted walking doesn’t, so a five-minute warm-up isn’t optional padding. Before you strap on the pack, spend 5 to 10 minutes on dynamic movement: leg swings, walking lunges, hip circles, and a few bodyweight squats to wake up the muscles that stabilize your knees and hips under load.
Start the ruck itself at a slower pace for the first quarter mile. Treat it as a moving warm-up rather than diving straight into your target pace with a full plate on your back.
Cool-down matters just as much, especially for your lower back and shoulders. Once you’ve dropped the pack, spend 5 to 10 minutes on static stretches: hip flexor stretches, hamstring stretches, and a doorway chest stretch to counteract the forward pull of the shoulder straps. A foam roller on your calves and quads, if you have one, helps reduce next-day soreness. Skipping the cool-down doesn’t cause an injury on any single ruck, but it adds up across weeks of training and is one of the easier habits to build early.
Common Rucking Injuries and How to Avoid Them
Blisters top the list of first-ruck problems, and they’re almost always preventable with the right socks and a properly broken-in pair of shoes. Hot spots on your feet are an early warning sign. Stop and address them with Moleskin or tape the moment you feel one forming, rather than pushing through and hoping it goes away.
Lower back strain usually traces back to one of two causes: a hip belt that isn’t carrying its share of the load, or a pack that’s overloaded for your current fitness level. Shoulder and neck tightness often comes from the same root cause, a hip belt that’s too loose or a pack riding too low on your back.
Shin splints and knee pain show up when distance or weight increases too fast. This is exactly why the progression in the training section above separates weight increases from distance increases instead of stacking both at once. If you feel a sharp, localized pain rather than general muscle fatigue, stop the session. Sharp pain is your body’s way of telling you something is being asked to do more than it’s ready for.
Chafing shows up wherever fabric or pack straps rub repeatedly against skin, most often at the neck, shoulders, and inner thighs. An anti-chafe balm applied before you start, not after you notice the problem, prevents most of it. Persistent joint pain, numbness, or swelling that doesn’t improve with a few days of rest is worth a conversation with a doctor before your next session.
Nutrition and Hydration for a Rucking Session
Hydration needs scale with effort and heat, not with a flat daily number. A useful baseline is roughly 12 to 16 ounces of water every 30 minutes of active rucking. For a shorter session under an hour, a single 20 to 32 ounce bottle usually covers it. Longer rucks need a refill plan, either a bladder system in your pack or a route that passes a water source.

Fuel before you start matters more than most beginners expect. A meal with complex carbohydrates and moderate protein two to three hours before a ruck gives you steady energy without the sluggishness of a heavy meal eaten right beforehand. For rucks longer than 90 minutes, a small carbohydrate snack, like a banana or an energy chew, partway through helps maintain pace in the second half.
Recovery nutrition closes the loop. A snack combining protein and carbs within an hour of finishing helps muscle recovery and reduces next-day soreness, and supporting your body’s antioxidant response after exercise can help manage the oxidative stress that builds up during harder training sessions. Electrolytes deserve attention too, especially on hot days or longer rucks where sweat loss goes beyond what plain water replaces.
Staying Motivated Through Your First Weeks of Rucking
The first few weeks of rucking are the hardest, not because the weight is heavy, but because the habit isn’t built yet. Set a specific, small goal for week one. Something as simple as “ruck twice this week at 15 pounds” beats a vague goal like “get into rucking.”
Tracking progress helps more than most beginners expect. Writing down weight, distance, and how you felt afterward turns an abstract effort into visible proof that you’re improving, which matters on the days motivation is low. Many veterans and active-duty service members find that rucking with a partner or a local group, whether that’s a formal ruck club or just a friend from the same unit, makes the difference between a habit that sticks and one that fades after three sessions.
Expect the first two weeks to feel harder than they should. Your body is adapting to load in a way that cardio alone doesn’t prepare you for. That discomfort is normal and it passes faster than most people expect once the basic tolerance builds.
Why Consistency Beats Gear Every Time
The biggest mistake I see beginners make isn’t a bad pack or the wrong socks. It’s waiting to start until the gear feels right. Rucking rewards the person who goes out three times a week with a daypack and a wrapped brick over the person who spends a month researching the perfect setup and never leaves the driveway.
That said, gear matters once you’re past the first few sessions. Respect the uniform standards of any organized military-division event you take part in, and treat your everyday apparel with the same intent: comfortable, durable pieces that hold up to sweat and repeated wear. Browse Warbeard Project’s gear guide for more on building out your kit as your training grows.
— Ian
Post-Ruck Comfort: Apparel That Fits a Rucker’s Routine
The right gear gets you through the ruck. The right apparel is what makes the hours before and after it comfortable, whether you’re heading to a group ruck at 6 AM or standing around afterward talking with the crew.
For training days and casual wear, the VietNam Classic tee and the Special Edition VAWP2607 Unisex classic tee hold up to sweat and repeated washing without losing shape. The PTSD classic tee and the Eat a D… Men’s classic tee work well for everyday wear, featuring direct messages that appeal to the veteran community.
Once the ruck is over and the temperature drops, layer up. The OG Logo Premium recycled bomber jacket is a light outer layer for cool mornings and community events, while the OG Logo Unisex Denim Sherpa Jacket handles colder post-ruck hangouts where you need real warmth. Back home, the OG Logo Women’s pajama shorts and OG Logo Women’s pajama pants are built for recovery, soft enough for a couch after a long training day.
Pick a piece that fits your next session, whether that’s a training tee or a post-ruck layer, and check sizing on the Warbeard Project product page before your next ruck.
Sources
- Toughruck
- Rucking Gear Guide - Packs, Plates & Shoes | Ruck Authority
- Rucking 101 For Veterans: How To Use Your Military Training For Civilian Fitness - VETERANS DIARIES